An Accidental Amateur Photographer
First a note on the slide shows and movies linked on the right hand side. Almost all of the pictures and definitely all the movies require flash format. While the movies start by themselves, the pictures has controls to the right. You can also use the arrow keys to move between pictures.
Most people have at some time held a camera in their hand, or been posing in front of one. The use of digital cameras has certainly led to an increase in this activity. What is the fate of all these photographs? Who is looking at them, and in what form? In the case of digital photography, I believe, most images stay in the camera, viewed through the small 2 inch viewfinder. Others end up on a data disk in an obscure folder, with an undecipherable file name, never to be seen again. This was the case for me until I started putting them up here. So this expose is probably more for me then for anyone else.
 When images were documented in silver crystals deposited on film, the photographs
ended up in drawers, in albums and framed on the walls. I don't think that many rolls
of film were left undeveloped. If one could just find the album, or the right drawer,
the photos were available.
I actually remember the time I picked up my first photographs after having delivered an
exposed roll of film to the local photo store about a week earlier. It was exciting
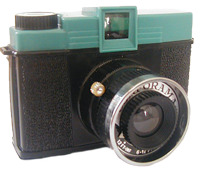
and I had no idea what to expect. I was 6 years old, my camera was a
plastic Diana, and I had shot frames of my friends at the playground. I don't
remember whether I was disappointed or happy with the outcome,
but at least one of the photographs turned out pretty good and I've kept it
ever since. It shows my friend Kjell at the swinging chairs.
I haven't seen Kjell since I was 7, but I still keep this Diana–photograph.
When images were documented in silver crystals deposited on film, the photographs
ended up in drawers, in albums and framed on the walls. I don't think that many rolls
of film were left undeveloped. If one could just find the album, or the right drawer,
the photos were available.
I actually remember the time I picked up my first photographs after having delivered an
exposed roll of film to the local photo store about a week earlier. It was exciting
and I had no idea what to expect. I was 6 years old, my camera was a
plastic Diana, and I had shot frames of my friends at the playground. I don't
remember whether I was disappointed or happy with the outcome,
but at least one of the photographs turned out pretty good and I've kept it
ever since. It shows my friend Kjell at the swinging chairs.
I haven't seen Kjell since I was 7, but I still keep this Diana–photograph.
 Ten years later my interest in photography was rekindled. I spent a year as
an exchange student in Claremont, California. My host family owned a small
newspaper - the Claremont Courier - and they were big on the visual aspect
of news. My 'host brother' was acting as an extra photographer for the
newspaper (with very good results) and I learned a lot during this year.
It also introduced my to the darker side of photography: the darkroom and
all the tricks and techniques one can apply to get a photo to look better
or more interesting than the original, or, as I prefer to see it, look more
like what the photographer had in mind before capturing the scene with the
camera.
Ten years later my interest in photography was rekindled. I spent a year as
an exchange student in Claremont, California. My host family owned a small
newspaper - the Claremont Courier - and they were big on the visual aspect
of news. My 'host brother' was acting as an extra photographer for the
newspaper (with very good results) and I learned a lot during this year.
It also introduced my to the darker side of photography: the darkroom and
all the tricks and techniques one can apply to get a photo to look better
or more interesting than the original, or, as I prefer to see it, look more
like what the photographer had in mind before capturing the scene with the
camera.
Darkroom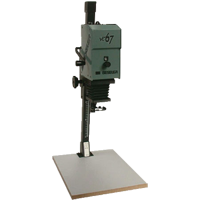
Over the years I have kept a darkroom wherever I lived. However, after some time I grew tired of black & white photos and started using color slides. The easiest way to get these developed was to again leave them at the photo store and pick them up a week later - just like the old photos of Kjell with the plastic Diana. The darkroom stayed, well, dark and unused. It wasn't until computers started to become powerful enough to support advanced photo editing programs that I returned to fiddling with photographs again - and there's where we are at the moment; A digital camera, a good computer and the CS3 version of photoshop.
'Photoshopping'
Photoshop is an amazing set of routines with an
almost infinite amount of stuff one can do. Photoshop has become the
foundation of all imaging software and the benchmark to which everything
else is measured against. Of course, one doesn't need photoshop to do
simple things that can fix a bleak photo. In fact, for 99% of what most
people do with their digital photographs, a smaller and simpler program
will do. So what are the most common things one can, need or even should
do to spice up photographs? I'll give my thought on this below, but first
a word about philosophies regarding photographic enhancement.
One group consists
of the purists, or photo-fundamentalists. They regard an exposed image as
something sacrosanct that can't be touched or changed in any way.
The camera doesn't lie and any fiddling with the original is the same
thing as distorting reality. A famous photographer of this school is Henri Cartier-Bresson who often left a small part of the edge of the film visible in the print – no cropping allowed.
One the other extreme is the surrealists, for
whom a photograph or image is not really needed in the first place. They
produce images using whatever means are at their disposal - and if they
use photoshop their arsenal is formidable. Some of the results are out of this
world, very beautiful and sometimes provoking. One could argue that
this is not really photography per se, but often there is an exposed image
somewhere in the artwork, even if it can be hard to distinguish in the final
product. I fall between these two categories. I'm closer to the first
group, not because I feel that an exposed image is untouchable but because
I don't master the techniques to perform all the magic of photoshop that
is needed to integrate photography and digital art. So what do I do, and
what is needed to turn a set of photos into something slightly more
interesting than the original? Very little, and very simple things suffice:
Three simple things to improve photographs
1. Crop the photograph. This is one of the most powerful tools in the arsenal.
By defining the area of interest, and putting the various pieces making up
the image in places where they catch the eye, it is possible to transform
a dreary photo into something which actually shows what it was that caught
the attention of the photographer in the first place. There are few photographs
that can't be improved by some amount of cropping, and cropping is a tool
available in even the simplest image handling program. Most photos of people
are taken with the photographer too far away from the subject - this is true
in 99.999% of all cases (my rough estimate, based in large part from my own
photos and what I've seen in albums and slide shows). A good photographer
gets up close and personal. Think Robert Capa: "If your pictures aren't good enough, you aren't close enough". Cropping is a way to fix this after the shot is taken.
2. Enhance the brightness and contrast. The camera does not record an exact reality, especially when it comes to color and luminosity. There's a whole science about color space, gamut and the like. It is not necessary to know about this to transform a flat photograph into something more realistic. Just use the tools available. Most programs will have a brightness/contrast control. While sufficient in most cases, photoshop offers some better tools (no surprise), like curves, levels, calculations, etc. Make a copy of your photo, apply a small amount of brightness/contrast correction and compare with the original. The enhanced image usually looks more like reality than the raw camera image. These tools can also be used to change any color tint that the camera may have added.
3. Sharpen the image. This is perhaps a little controversial. I usually apply a bit of unsharp masking (this sharpens the image despite the name implying the opposite). The photo you get from a camera is not infinitely sharp - and sometimes one doesn't want it to be - the pixel resolution, the focus and perhaps movement, all add up to a certain amount of blurriness. A bit of sharpening can improve things a lot, but one has to apply the sharpening selectively. This is probably one of the more complicated of the simple techniques. Here's how I do it; Unsharp masking has three controls: Amount (in percent), Radius (size) and Threshold. Starting with Radius, it determines the smallest resolution element that will be sharpened. A small value, say 1, will enhance the smallest element, that is, a pixel. The Amount is an amplifier that amplifies the small scale structure defined by the Radius. Setting the Amount to 100% simply means that nothing is changed (although it looks like a small amount of sharpening is indeed taking place - something is being done to the image). Putting it higher than 100% and the small scales become enhanced. A setting smaller than 100% doesn't change anything in the image. The Threshold is simply a brightness limit to what areas of the image that will be affected by the sharpening, a value of 0 or 1 means that the whole image will be affected. This technique, while a bit complicated, is very powerful and it is well worth the while to experiment with it. Surprisingly, many simple photo editing programs do have this tool in their arsenal.
Better photographs
The best way to take better photographs is to take a lot of photographs and look at them with a critical eye; What was it you tried to capture and why didn't it come out the way you wanted. Another important thing is to look at other peoples photographs and simply be inspired. This exercise can at times have a de–spiriting effect; I can never take photographs as good as <insert name of good photographer>. However, even by trying to emulate a nice capture by another photographer, you are likely to come up with something which is unique for you.
This brings me to an end of these photographic rambling. To emulate the famous Forrest Gump: that's all I have to say about that.